Wednesday 29 June 2011

Horchata


I'm settling into a routine these days,  get up early, try to get some writing done, then I treat myself to some nice iced tea/coffee and some fruit, then I try to get some more writing done, then I pretend to be sporty while i wheeze my way through another run, followed by a quick lunch, some more writing, and then it's already time for another glass of frozen amazingness before it's already dinner-time (unless Verena makes me go swimming or something else, oh and this whole thing is obviously interspersed with waaay too much procrastination).
Anyhow, the reason I'm telling you about my decidedly boring life is because the iced coffee breaks have definitely become the highlight of my day. So when David Lebovitz posted his horchata recipe yesterday I obviously had to make some. And swapping the iced coffee for some horchata has kinda turned today into the best day of my week so far (not that I don't like the iced coffee but since horchata tastes even more like rice pudding than rice milk already does it trumps any other drink).
David suggests grinding some white rice in your blender but since I a) don't have a proper blender and am not planning on ruining my coffee grinder and b) tend to have a bag of ground rice sitting around in my cupboard I just went for the already ground rice. Oh, and I reduced the sugar because I felt it was more than sweet enough with half a cup.

Horchata
1/2 cup Ground Rice
3 cups Warm Water
1 Cinnamon Stick (ca. 5cm)
1/2 cup Sugar
2 cups Milk (I used unsweetened soy)

In a bowl combine the rice and the water. Add the cinnamon stick, then cover and leave it alone for at least 8 hours.
When you come back to the mix, fish out the cinnamon stick and strain the mixture through a sieve lined with cheesecloth.
All you need to do now is add the milk and sugar, pour some over some ice and then sit back and relax for a bit.

Saturday 25 June 2011

Frozen Rhubarb Fool


While I am attempting to finally find a scone recipe that gives me scones the way I like them (we're on batch number 6 or so) I thought I could cheer us all up with a recipe that does actually work (unlike the scones saga...).
And before you say anything, I know I've been bombarding you with rhubarb recipes, but a) rhubarb is amazing and b) it grows in our garden and is free :)

Frozen Rhubarb Fool
300g Rhubarb, trimmed weight
75g Sugar
A pinch of Nutmeg
1/2 Vanilla Pod
1 tsp Rosewater
1/2 tsp Fleur de Sel
2 tbsp Rum
200ml Whipping Cream

Cut the Rhubarb into 2.5 cm pieces and combine with 50g of the sugar in a saucepan. Cover and heat at the lowest possible heat so the rhubarb 'sweats' for about 10 minutes. Once the rhubarb is swimming in its own juices turn up the heat a bit, then add the nutmeg and rosewater. Simmer until the rhubarb is cooked through. You can test the flavour now and, if you feel this is waaay to tart, add some more sugar (not from the 25g we put aside though, and keep in mind that we will be adding some sweet whipped cream to the rhubarb in a bit). Take the rhubarb off the heat and add the salt and the rum. We're adding these two to lower the freezing point a bit so our 'ice-cream' stays softer once we freeze it.
Allow the rhubarb to cool down completely, then whip the cream and the remaining 25g sugar and the seeds from the vanilla pod (keep the pod for flavouring another dish such as rice pudding). Try to not eat all of it (or is that just me who does that?) and fold in the rhubarb mix.
Freeze the mixture in a shallow dish (I tend to use an old ice cream container for this) and stir it with a fork every once in a while to make the crystals smaller. Obviously, if you have an ice cream maker scratch the previous sentence and let the ice cream maker work its magic.
Anyhow, I hope it is warm enough for lots and lots of ice cream where you are!
Do you have a favourite flavour at the moment? The rhubarb thing is turning into my favourite these days, but I've also been thinking of the blackberry one I made last year....and the plum one...and I really want to try those super cute rice pudding popsicles Nicky wrote about earlier this month.

Friday 24 June 2011

What keeps my brain going at the moment


I've been hiding away from the world trying to bore myself into some writing for the last couple of days (more or less successful on that front) and have been working on my caffeine addiction. But you don't have to worry, none of the red bull excess of MUNBW times (don't ever let me work on a project that is sponsored by them like ever again) or the 2 cups of coffee before breakfast I have sometimes been seen with either.
Molly who writes Orangette tweeted about this article in the NYTimes last week which reminded me of the sheer amazingness that is cold-brew coffee.
I know, how could I forget?!? but in my defence it rarely(no, scratch that, never) gets warm enough around here that you're really craving an iced coffee. Well, at least I don't.
But I was in the mood for some procrastination and decided to make some and I think so should you.
Especially if you live somewhere warm.
Anyhow, I didn't go for the Japanese iced method because believe it or not I do actually have a life (ok, all I do at the moment is write and eat but still...) and I had everything for a steep and strain approach in the house.
So what can I tell you - my productiveness has gone up like crazy and I blame the coffee and not the fact that I am finally getting my act together :)
The recipe below is based on the one in Oliver Schwaner-Albright's article but since chicory coffee makes my throat itch (Linde's tastes really nice though) I went for plain old coffee - well, actually I went for some coffee my mum gave me (thank you!!!!) which is one of the nicest roasts I've had in ages.


Feinschmecker magazine listed them as one of the top German artisan coffee roasters and if you ever visit Heidenheim you should definitely go and get some coffee at Schwarz Coffee Shop (just saying...and no, I don't get free coffee there...).

Cold-Brew Coffee Concentrate
90g Coffee, ground
500ml Water, cold

Put the coffee into a container that is big enough to hold all the water as well (I use a 1 litre glass milk bottle). Next pour some of the water over the coffee, stir things together, then add the remaining water but don't stir again.
Cover and leave it alone for 12 hours (no shaking or whatever else you might want to do with it when you get bored) so overnight is a really good time to do this. After 12 hours strain the coffee. You could use a fine sieve but I'm lazy so I used my french press and it worked just fine (and took like only 5 seconds).
You can make iced coffee with this concentrate (1/4 concentrate, 3/4 milk) or you could heat the milk and turn the whole thing into a latte...or...you could replace the ice cubes with vanilla ice cream :)

Sunday 19 June 2011

Banana Soft Serve


We're having a gloriously summery day here in St Andrews, it's even warm enough to wear shorts (ok, I'm sitting here with the shorts and a warm sweater but I'm determined to not take those shorts off...)
Anyhow, since I told you a while back I wasn't going to give you any summery recipes until it was summer here you get an extra summery recipe today.
Anyone remember the vegan banana soft serve everyone was making a couple of years back? Jenna's post a few weeks back reminded me of how amazing and addictive that stuff was so I made some last week (while wearing warm woolly socks) and I was catapulted right back to the gloriously hot summer of '09.
Do you remember where you spent your summer that year? I spent mine summer school hopping, enjoying the sun, finally riding my bike again and reading papers sitting next to a lake.
So...if you are looking for a lovely snack that comes together in less than 5 minutes and will make you smile for the rest of the afternoon, make some banana soft serve (again)!

Banana Soft Serve
2 Bananas per person (frozen, cut into pieces - either freeze them with the skin on and then cut the skin off before chopping them or peel them and freeze them already cut into pieces in a ziploc bag)

Stick the bananas into a food processor (the kind with a blade) and blitz the whole thing for 2 or 3 minutes until it's all creamy.
Done :)

Thursday 16 June 2011

Twitter

So I've decided to give twitter a chance. You can now follow me at TeaCakeSandwich (the subscribe button is on the right side-bar) and hear all about the kitchen disasters that tend to happen before I get to posting the final recipe.

Wednesday 15 June 2011

Rhubarb Lattice Tart


I know, it's been a while - I've been busy with writing, running, eating, swimming, sleeping, and a Buffy marathon (ok, if I'm perfectly honest not necessarily in that order) and I kinda stopped doing anything else.
So now that I finally feel like I'm on track with my writing again (and Spike saved the world :) ) I thought I could share a tart recipe with you. I made this tart for a dinner last week and I must say that I am slightly in love with this recipe. It all started with Oliver Peyton's Rhubarb Lattice Tart which looked amazing (the book - British Baking is gorgeous in general) but I never quite understood everyone's obsession with plain flour when making a dough that brings out the flavours of all it's ingredients (and we've had this bag of rye flour sitting around for a while now, and rhubarb and rye both start with r...ok, I'm just making up random reasons now).
Anyhow, I wasn't disappointed, the subtle sweetness of the rye flour brought out the flavour of the rhubarb without being overpowering.
The dough takes some time because you'll want to rest it a couple of times before you actually get to the point of filling the tart but the actual hands-on time for this tart is about 20 minutes. So I'd say it's the perfect desert if you're trying to get some writing done and don't have a clue what to bring to that dinner party later that night.
Oh, and I used a 24cm flan dish.

Rhubarb Lattice Tart
150g Plain Flour
100g Rye Flour
1 tbsp Sugar
1 tsp Salt
175g Butter, cold, cut into 1cm pieces
1 tsp Apple Cider Vinegar
Some really cold Water

500g Rhubarb (trimmed)
200g Sugar
2 tbsp Cornflour
A pinch of Salt

Mix the flours, sugar and salt in a bowl, then rub the butter into the dry ingredients. Just like with a normal pie dough you'll want the butter pieces to remain fairly large - think the size of a pea - because the water evaporating from those pieces of butter will turn the whole thing into flaky pastry goodness once you bake the dough.
Now you add the vinegar and about 8 tbsp of the water to the mix and start working everything together. You don't want a super-well mixed dough at this stage, you just want everything to come together in something resembling a lump. If you can't get the mix you have to hold together because it's too dry, add more water 1 tablespoon at a time.
Wrap the ball of dough in some cling-film (you can sprinkle the whole thing with a tiny bit of water before you wrap it) and let it rest in the fridge for at leas an hour (i.e. you can go and do some work now).
When you get back, unwrap the dough and place it on a floured surface and squeeze it into the shape of a rectangle before you start rolling it out with a rolling pin.
Don't worry if the dough starts out being slightly awkward to handle and bits and pieces falling off. This will get better in a couple of minutes.
Roll out the dough until it's about 20x30 cm in size.
Now fold the dough into thirds. I really like  Kim's explanation of this - she suggests you fold the dough like you would fold a letter. Once you've done that, rotate the dough by 90˚ and roll it out again.
Repeat the folding and rolling until you have folded the dough 3 times.
I guess you could skip the following step but I tend to prefer working with chilled pastry dough so I suggest you give the dough rectangle another hour or so in the fridge and get on with some more work :)
Cut the dough in half and stick one half straight back into the fridge.
Grease your flan dish.
Roll out the other half until it's big enough to line the flan dish.
Cover the lined flan dish with cling-film and chill it for another half an hour or so which will give you time to get the rhubarb ready.
Preheat your oven to 200˚C.
In a bowl combine the sugar, cornflour and salt.
Cut the rhubarb into 3cm pieces and toss them in the cornflour-sugar mixture.
Now take the flan dish out of the fridge and fill it with the rhubarb mix.
Do you remember that spare piece of pastry?
Take it out of the fridge and roll it out until it's about as thin as the other piece was before. Cut the pastry into 1cm strips and weave them into a lattice pattern covering the rhubarb. If you have some strips left at the end you can use them later to cover the lattice ends.
If you feel like it brush the lattice with an egg-wash (I tend to be lazy and just go for milk) then cover the rim with the spare pastry strips. They also like the egg-wash :)
Bake the tart for 45-55 minutes and allow it to cool before you remove it from the flan dish.
Serve by itself, with some custard, or some ice cream and a good gossip with some lovely people.

Wednesday 8 June 2011

Maple-Pecan Birthday Cake


Last week we had a surprise birthday party for Louise and I was in charge of - guess what - the cake.
After spending an evening sitting on my bed with my baking books spread out around me I was honing in on a winner. I wanted something with nuts and I didn't want to make a chocolate cake. In the end I ended up going for the vanilla cake in the Magnolia Bakery cookbook with a maple syrup buttercream and some pecans thrown in.
I don't think I'll ever be a huge fan of layered cakes but there is something special about having a layered cake as a birthday cake.
For any special occasion really.
Perhaps it's that even though they aren't much more work than a loaf cake they do look like you put loads of work into it.
I don't know, does anyone else have an opinion on this?
Anyhow, the cake - make the icing the night before you want to make the cake, that way the icing becomes less grainy (from the sugar) and it'll take less time on the day. That said, this is one of those cakes you can make while still doing work - there's quite a lot of steps but there's time between them so you can tidy your room (probably should have gone for that option), or get some writing done, or read an article, or whatever else you can think of.
Oh, and this is one of those cakes where it is just way easier to use measuring cups, so get some if you don't have them already :)

Maple-Pecan Birthday Cake

Maple Icing
2 cups Butter, unsalted, at room temperature
5 cups Confectioner's Sugar, sifted
11/2 cups Light Brown Sugar
1/2 cup Milk
3 tbsp Maple Syrup

Cream the butter for about 3 minutes (electric mixer...unless you have awesome muscles :) ) then add the sugars and keep the mixer going at a low speed for another 2 minutes.
Now you add the milk and syrup and beat for another 3-5 minutes. You will notice that it's ready when it goes all smooth and creamy and awesome.
Store this icing at room temperature (for up to 2 days) until you are ready to ice the cake.


Cake
11/2 cups Self-Rising Flour
11/2 cups Plain Flour
1 cup Butter, unsalted, at room temperature
2 cups Sugar
4 Eggs, at room temperature
1 cup Milk
1 tsp Vanilla Extract

Preheat your oven to 175˚C.
Grease and flour the side-bits of three 18 cm  cake tins. Cut out baking parchment to fit the bottom of each tin and assemble the tins.
Mix the flours in a small bowl. In your favourite mixing bowl (I don't know about you, but I definitely have a favourite bowl amongst my mixing bowls) cream the butter for about 3 minutes (we're still using an electric mixer for this), then add the sugar and beat for another 3 minutes. Add the eggs one at a time and make sure they are well incorporated into the batter.
Now you add the flours and the remaining wet ingredients alternating (i.e. 1/3 of the flour, 1/3 of the milk, another 1/3 of the flour, etc). Make sure you don't overbeat the batter at this point.
Divide the batter between the tins and bake the cake for 25-30 minutes.
Allow the cake to cool in the tins for the first hour, then give them another hour or so on a wire rack until they are completely cooled.

Assembly & Garnish
11/2 cups Pecans, coarsely chopped, toasted (you can toast them in the oven after you have taken the cake out. At 175˚C this should probably take just under 15 minutes. Make sure you turn them every once in a while)

To ice the cake, brush all crumbs off the cake layers. Then spread some icing between the layers and sprinkle some pecans on each layer (just under 1/3 of the pecans on each layer). Stack the layers on top of each other, then ice the top (if you haven't done so already) and the sides. Sprinkle some more pecans on the top and attempt to stick some to the sides (I am told you can throw them at the side and they will stick to the cake - I seem to be too stupid to get this to work so I tend to just stick them to the side by hand).

Enjoy a tiny slice of this cake (trust me, unless you want to develop type 2 diabetes or something else on the spot, start with a very small piece, you will get a sugar high no matter what) with some coffee or milk and preferably with lots of birthday candles on top :)

Monday 6 June 2011

Kelsey's Trail Mix


When I was staying with Kelsey last month she introduced me to her tail mix and I've been hooked ever since. I'm sure I'm going through that stuff at a speed that is slightly unhealthy but if, like me, you really can't make it through the day on 3 meals and you can't face eating more than one protein bar a day, then this mix might make you as happy as it makes me.
Unlike with a lot of bought stuff there's no sugar high, and you can control what you put in. Thinking of it, my dad would be proud of me for making my own trail mix...this is a scary thought...next thing I'll start mixing my own Müesli for breakfast.
Anyhow, let's make some trail mix!

Kelsey's Trail Mix
1 cup Pecans
1 cup Roasted Almonds (if you can find lightly salted ones go for those, I couldn't so I added 1/4 tsp fleur de sel to my final mix)
1 cup Cashews
1 cup Dried Cranberries (try to get unsweetened ones)
1 cup Dried Blueberries (same here)
1/2 cup Dark Chocolate, chopped into little pieces, or Cocoa Nibs

Mix all the ingredients in an airtight container and stop yourself from eating the whole thing in one go. I tend to have to physically remove myself from the container or I won't stop eating this stuff. Oh, and it's really nice sprinkled over some yoghurt as well :)
I hope you have a good start of your week!

Saturday 4 June 2011

Sweet Potato Pancakes - The Recipe


Last weekend I finally got around to making the sweet potato pancakes I have been dreaming about since having some at Highland Bakery with Kelsey.
If you're still unsure about what to do this Sunday, how about you invite some friends over for pancakes? They'll love you enough to offer to bring some gin for your boardgame night the following weekend :) what more could you want?!?
This recipe is based on one I saw on La Fuji Mama earlier this year but never got around to trying them but as expected, they were just as amazing as everything else Rachel writes about.
Anyhow, let's make some pancakes!

Sweet Potato Pancakes
450g Sweet Potatoes
130g Plain Flour
50g Rye Flour
80g Kamut Flour
1 tbsp Baking Powder
1 tsp Salt
1 tsp Ground Cinnamon
1/2 tsp Ground Nutmeg
1/2 tsp Ground Ginger
1 tbsp Sugar
55g Butter
11/2 tbsp Molasses
2 Eggs, beaten
1 tbsp Vanilla Extract
350 ml Milk

Before you can make your pancakes you'll have to cook your sweet potatoes. The way I normally do that is by peeling them, chopping them into chunks about the size of the ones in the picture and boiling them until they are tender (and yes, that probably washes out all the vitamins and stuff but hey, we're making pancakes, let's be honest, if you're gonna drown them in maple syrup it's not like the vitamins are gonna make much of a difference, embrace the unhealthiness and have an apple in the afternoon). If you want to boil them whole, then wait until they're cold enough to peel  etc. be my guest but don't expect to ever see me do that :)
Once the sweet potatoes are boiled, you can mash them with a fork or a potato ricer.
If you're making them in advance because you want to have people over the next day but you also want to go swimming in the morning, cover the sweet potato mash with cling-film and stick them in the fridge overnight. You could even get the dry ingredients ready which, if you're doing everything in one go is what you'd want to do right now anyway.
Mix all the dry ingredients in a small bowl and set aside.
If you mashed the sweet potatoes the night before, melt the butter, otherwise the sweet potatoes will do the job for you, and stir the butter into the mash. Then whisk in (i.e. with one of those wire whisk things, not the electric one, even my wrist is strong enough for this batter so no whinging) the eggs, molasses, vanilla extract and milk.
Once the wet mix is well combined, add the dry mix and stir everything together. Things don't have to be super combined, especially with the sweet potatoes in the mix it's going to be lumpy anyway from the sweet potatoes.
Anyhow, give the batter some time to rest (mine only had about 5 minutes and it worked just fine) and get a skillet or griddle ready.
Once the skillet is hot add some butter and once that is bubbling away spoon in about 1/4 to 1/3 cup sized scoops of the batter depending on what size you want them to be.
You'll want to turn them once the top side starts bubbling, so it will probably still be fairly goopy. I have found that yes, that way you might ruin a pancake or two but the ones that I turned once the top seemed as well-done as I would have expected from a normal pancake were consistently burned and I had my heat on the low side and I had borrowed Ashley's fancy pan so I think for these lovelies you'll just have to suffer through a few ugly ones unless burned pancakes are your thing :)
Right, I'm starting to ramble, go and give these a try, they were absolutely lovely and they're super nice with some maple syrup and lots and lots of berries and banana slices.
I hope you have a fab rest of your weekend and that the weather is nicer where you are!

Thursday 2 June 2011

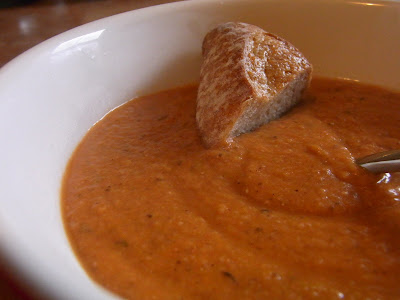
Black-Eyed Bean and Roasted Pepper Soup


I know a lot of you live in places where it actually gets warm but around here we have been getting excited about the semi-lack of rain (there was some hail on Monday though) and the balmy 16˚C we've been having for the last couple of days...I mean isn't it exciting if you don't have to wear a scarf...
Anyhow, the reason I'm complaining is twofold a) I think complaining about the weather here makes it so much easier for me to write because leaving the cold asap is a really good motivator for me (and if I finish writing up quickly enough I'll get to go on a holiday with my friend Sandra so I'm writing like a crazy person right now) and b) I know you might not want to cook what I write about these days because it'll be too warm for where you are right now but I won't start making ice-cream or anything else like that until I stop making a hot water-bottle every evening :)
So after all of that, today's recipe is one for a lovely soup I made a while back when the wind decided to uproot the tree in front of our house and when the only thing you really wanted was curl up under a blanket and drink some tea.

Black-Eyed Bean and Roasted Pepper Soup
1 cup Black-Eyed Beans, dried
2 Red Peppers
1/2 Onion, diced
2 Garlic Cloves, minced
Vegetable Stock
1/2 tsp Salt
1/2 tsp Pepper
A pinch of Cayenne Pepper
1 tbsp Tomato Puree
3 tbsp Parmesan, grated

The night before you are planning to make the soup soak the beans in cold water.
On the day, drain the water, and cook the beans in some fresh water until they are tender. This depends a bit on the the size and age of your beans so just keep checking, mine took just over an hour.
While the beans are cooking, preheat the grill in your oven.
Wash the peppers, pat them dry, half them and deseed them. Then put them into a baking dish skin-up and stick them under the grill for about 20 minutes. You'll want to check them every once in a while to make sure they're not  super black on one side and still completely raw on the other side (i.e. you might have to rotate them) but some charring is perfectly acceptable. When they're starting to be done the skin will start lifting off in some places and they'll start looking softer.
Take them out of the oven and let them cool.
Once the beans are cooked through, drain them and put them to the side.
If you haven't done so, dice the onion.
Take the cooled peppers and peel off the skin (most of it will just rub off, but if you're having problems with some bits, a knife should do the job :) ) and dice them.
Heat some olive oil in a pot, then sauté the onions, once they're all lovely and translucent, add the garlic and wait until your kitchen smells like you're trying to get rid of some vampires (I know, I've been watching too much Buffy), then add the beans and pepper.
Add enough stock to cover everything and give the beans and the peppers some time to get to know each other, about 10 minutes should be enough.
Puree everything until you have a very smooth soup, then season with salt, pepper and some cayenne pepper if you feel like a bit of a kick.
Stir in the tomato puree (this is mainly for the colour but it also works wonders flavour-wise).
Just before you're ready to serve the soup, add the parmesan.
Enjoy your soup with some fresh bread and some tea if you're still not warm enough :)
Related Posts Plugin for WordPress, Blogger...